Team Members & Seats
Team Members is where you build out and run your workspace. From a single page you can invite teammates and clients, watch how many seats your plan is using, and control every person’s role, status, and project access.
The page has three layers: the seat usage bars at the top, a pair of tabs for Members and pending Invitations, and a per-member Actions menu. This guide walks through each one in detail so you know exactly what every column, badge, field, and menu item does before you act.
On this page
Open Team Members
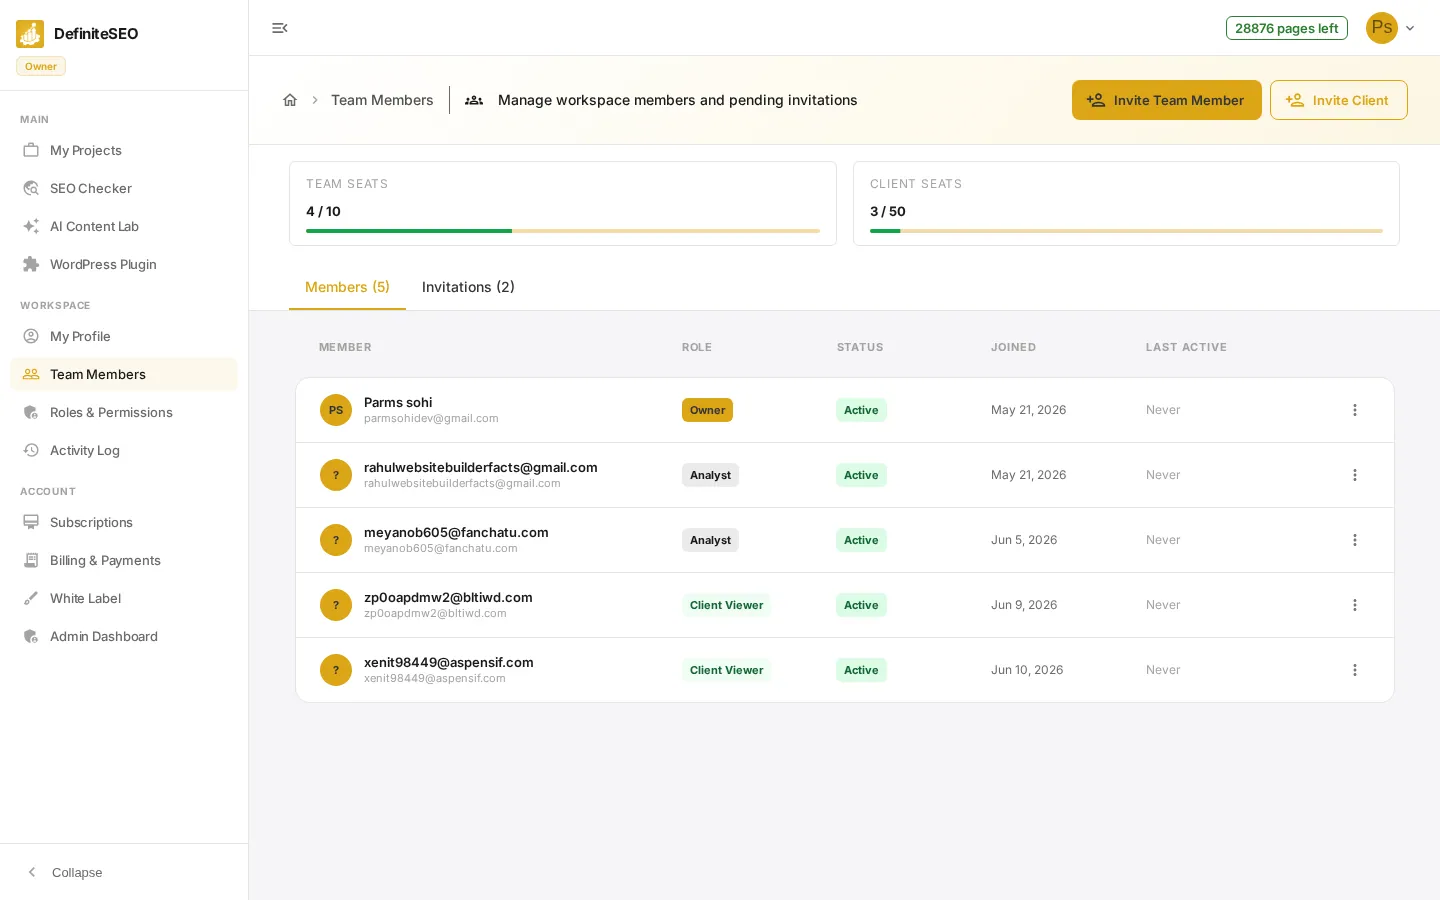
In the dashboard sidebar, under Workspace, click Team Members. The page opens with your seat usage at the top, then the Members and Invitations tabs, and the members table below. The header also carries the primary Invite Team Member and Invite Client buttons on the right.
📝 Note Managing team members is available to workspace owners and admins. Exactly which buttons and menu items you see depends on your role's permissions, so a member with fewer permissions will see fewer options.
Read the seat usage bars
Two cards at the top track your plan’s capacity. Each shows a used / total count and a progress bar so you can tell at a glance how much room you have left before you need to upgrade.
- Team Seats: The pool for internal roles: Admin, Manager, and Analyst. The count reads used over total, for example 4 / 10, with a bar that fills as seats are taken.
- Client Seats: A separate pool for the Client Viewer role, for example 3 / 50. Clients never consume Team Seats and team members never consume Client Seats, so the two pools fill independently.
- Progress bar color: The bar is green while seats remain. It turns red once the pool is full (used equals total), signaling that you must free a seat or upgrade your plan before inviting anyone into that pool.
💡 Tip Removing a member frees their seat in the matching pool immediately, so you can recover capacity without changing your plan.
Switch between Members and Invitations
Below the seat bars are two tabs. Each tab label carries a live count so you can see your totals without clicking in.
- Members tab: Shows everyone who has joined the workspace, with the count of current members in the label, for example Members (5). This is the default tab.
- Invitations tab: Shows invitations that are still pending (sent but not yet accepted), with the pending count in the label, for example Invitations (2). Accepted, declined, and revoked invitations are not listed here.
Read the members table
On the Members tab, each row describes one person across six columns. Reading left to right:
- Member: The person's avatar (their initials, or a question mark when no name is set), display name, and email beneath it. If a name is missing the email is shown as the name. A small red lock icon appears next to the name when the member's seat is disabled, with a tooltip reading Please renew your plan or Please upgrade your plan. Click anywhere in this cell to open the member's full profile.
- Role: A color-coded chip showing the workspace role: Owner, Admin, Manager, Analyst, or Client Viewer. Each role has its own styling so roles are easy to scan down the column.
- Status: A badge reading Active (green) or Suspended (red), telling you whether the member currently has access to the workspace.
- Joined: The date the member joined your workspace, formatted like May 21, 2026.
See 2 more checks
- Last Active: The date the member was last active, or Never (shown in a muted gray) if they have not signed in since joining.
- Actions: The three-dot icon at the far right of the row opens a menu with everything you are allowed to do for that member.
📝 Note If there are no members yet, the table is replaced by a No members found. message inside an empty card.
Understand the role chips
The chip in the Role column tells you exactly what a member can do. Here is every role label the workspace uses:
- Owner: The workspace creator, shown with the primary highlight chip. The Owner role cannot be changed, suspended, or removed from this page.
- Admin: A full-access internal role, shown with the secondary highlight chip. Consumes a Team Seat.
- Manager: An internal management role, shown with an indigo chip (indigo text on a pale indigo background). Consumes a Team Seat.
- Analyst: An internal role that can be scoped to specific projects, shown with the default gray chip. Consumes a Team Seat.
- Client Viewer: An external client role, shown with a green chip (green text on a pale green background). Consumes a Client Seat and can be scoped to specific projects.
Invite a team member or client
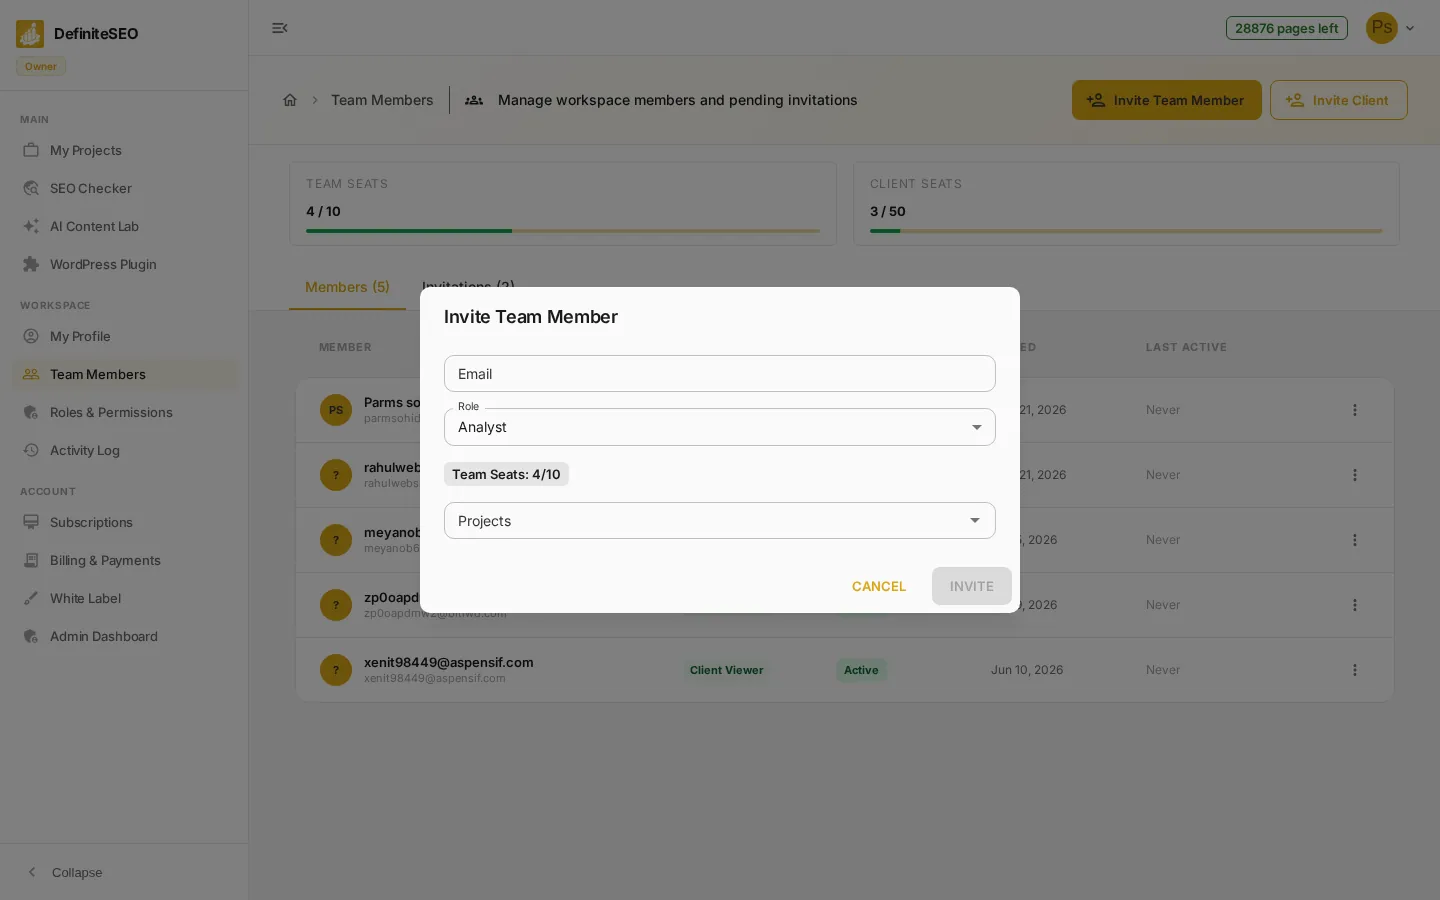
Click Invite Team Member (or Invite Client) to open the invite dialog. The title reflects which button you used. Fill in the fields, then click Invite. The dialog walks through these controls:
- Email: The email address of the person you are inviting. It is validated before sending; an invalid address shows Please enter a valid email address. and blocks the invite.
- Role: A dropdown of the roles you may assign. From Invite Team Member it lists the Team-Seat roles (Admin, Manager, Analyst); from Invite Client it lists the Client-Seat role (Client Viewer). The Owner role is never offered.
- Seat indicator: A small chip such as Team Seats: 4/10 or Client Seats: 3/50 that matches the seat pool for the chosen role. It turns red when that pool is at capacity.
- Projects: A multi-select that appears only for the Analyst and Client Viewer roles. Pick which projects the person can see; leaving it empty grants the role's default scope. Changing the role clears any selected projects.
⚠️ Warning Clicking Invite sends a real invitation email and uses a seat. Only send invites you actually intend to. The Invite button is disabled when the email is empty or the matching seat pool is full; a full pool reports Seat limit reached, and inviting an existing member reports Already a member.
Manage pending invitations
Switch to the Invitations tab to track invites that have not yet been accepted. Each row lists the invited Email, the Role chip, a Status badge (Pending in amber), the Created and Expires dates, and two actions:
- Resend: Sends the invitation email again to the same address, useful if the original was missed or expired soon.
- Revoke: Cancels a pending invitation before it is accepted, freeing the seat it was holding. You are asked to confirm, since the invite link stops working once revoked.
📝 Note When there are no pending invitations the tab shows a No pending invitations card reading Invited members will appear here. instead of a table.
Manage an existing member
Open the three-dot Actions menu on any member’s row to manage them. The available items depend on your permissions, the member’s role, and the member’s current status:
- View: Always available. Opens the member's full profile, showing their role, status, and assigned projects.
- Change Role: Moves the member to a different role, which can also switch which seat pool they consume (for example moving them from a Team Seat to a Client Seat). Hidden for the Owner, for your own row, and when you lack the change-role permission.
- Assign Projects: Limits a scoped member to specific projects (see the Project Assignment guide). Available from the menu for every listed member.
- Suspend: Temporarily blocks the member's access while keeping their seat. Shown only for active, non-Owner members when you have the suspend permission. You are asked to confirm before access is cut.
See 2 more checks
- Reactivate: Restores access to a member who was previously suspended. Shown only for non-active members when you have the reactivate permission.
- Remove Member: Permanently removes the member from the workspace and frees their seat. Shown in red, only for non-Owner members when you have the remove permission, and behind a confirmation that warns the action cannot be undone.
⚠️ Warning Change Role, Suspend, and Remove change a person's access right away. Suspend and Remove require confirmation, and removal cannot be undone. Use them carefully. The Owner can never be changed, suspended, or removed from this page.