Roles & Permissions
Roles & Permissions is the access-control center for your workspace. It decides exactly what every member can see and do, from running an audit to inviting teammates or cancelling a subscription. Each role is a named bundle of permissions, and each member carries one role.
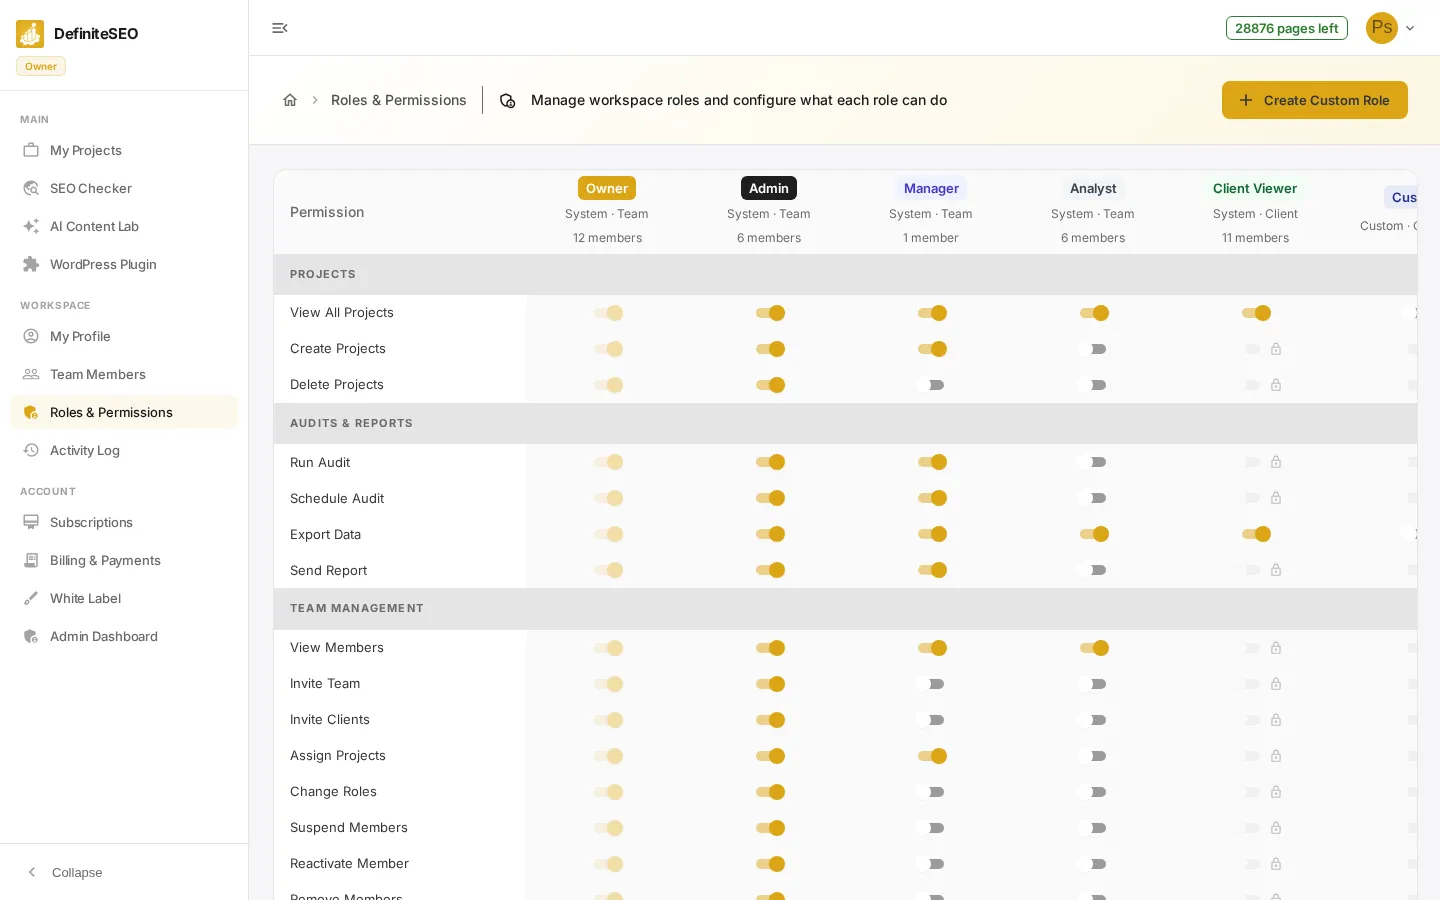
Everything is shown as a single grid called the permission matrix: each role is a column, each permission is a row, and the switch where a row and column meet says whether that role has that permission. Permissions are organized into labelled category groups so related toggles sit together.
This guide explains every part of the page: the role columns and their seat types, the five built-in roles and what each one can do, the permission groups and what they control, the locked behavior for the Owner and for client seats, how to create your own custom role, and how to save or discard your edits.
On this page
Open Roles & Permissions
In the dashboard sidebar, under Workspace, click Roles & Permissions. The page header reads Manage workspace roles and configure what each role can do, and below it the full permission matrix loads with one column per role and one row per permission.
📝 Note Opening and editing this page requires the Manage Roles permission, which the Owner and Admin roles have by default.
Read a role column
Each column is one role. The header stacks three pieces of information so you can size up a role at a glance:
- Role name (colored chip): The role's display name shown as a colored pill. The five built-in roles each have their own color: Owner is gold, Admin is black, Manager is indigo, Analyst is gray, and Client Viewer is green. Custom roles get a default blue chip.
- Type and seat pool: A caption reads either System or Custom, then the seat type. Built-in roles are System; roles you make are Custom. The seat type is Team for normal team roles and Client for client-viewer seats, which draw from a separate client-seat pool.
- Member count: When at least one active member holds the role, a line such as '6 members' shows how many people currently use it. A role with no members shows no count.
- Delete control (custom roles only): Custom role columns include a small trash icon next to the caption for deleting the role. System roles never show this icon and cannot be deleted.
Understand the default roles
Every workspace ships with five built-in (System) roles, listed left to right from most to least access. Their permissions come from fixed templates:
- Owner (Team seat): Total control of the workspace. The Owner has every permission turned on, including billing actions such as Upgrade / Downgrade Plan and Cancel Subscription, plus Manage Roles. The Owner's switches are always on and cannot be changed.
- Admin (Team seat): Manages the team, projects, branding, and most settings, and can manage roles and view the audit log. The Admin can buy add-ons and subscriptions but, unlike the Owner, cannot Upgrade / Downgrade Plan or Cancel Subscription.
- Manager (Team seat): Runs day-to-day SEO work across all projects. The Manager can view all projects, run and schedule audits, export data and send reports, view members, invite clients, and assign projects. The Manager cannot create or delete projects, invite team members, change roles, or touch billing and roles.
- Analyst (Team seat): A hands-on contributor focused on audits and reports for assigned projects. The Analyst can run audits, export data, and view members, and has access to SEO Analysis, AI Content Lab, and the WordPress Plugin. The Analyst cannot view all projects, schedule audits, send reports, manage the team, or touch billing.
- Client Viewer (Client seat): A read-only client role that draws from the client-seat pool. By default it can only export data, and the matrix restricts it so that just View All Projects and Export Data can ever be enabled. Every other permission is locked off for this seat type.
Understand the permission groups
Permission rows are bundled under bold category headers so related toggles stay together. The matrix has seven groups, in this order:
- Projects: Controls project access and lifecycle: View All Projects, Create Projects, and Delete Projects.
- Audits & Reports: Controls audit and reporting actions: Run Audit, Schedule Audit, Export Data, and Send Report.
- Team Management: Controls people and access management: View Members, Invite Team, Invite Clients, Assign Projects, Change Roles, Suspend Members, Reactivate Member, Remove Members, and Manage Roles.
- Workspace Settings: Controls white-label and branding configuration: Edit Branding and Configure CNAME.
See 3 more checks
- Billing: Controls plan and payment actions: View Plan Quota, View Billing, View Subscriptions, Upgrade / Downgrade Plan, Buy Add-ons, Buy Subscription, and Cancel Subscription.
- Administration: Controls oversight access: View Audit Log, which lets a role open the workspace Activity Log.
- Features: Controls access to product areas: SEO Analysis, AI Content Lab, and WordPress Plugin.
Read and toggle a permission switch
Where a permission row meets a role column there is a switch. A gold switch is on, a gray switch is off. Click any editable switch to flip it; the cell is highlighted to mark it as a pending change until you save.
- Owner switches are locked on: Every switch in the Owner column is fixed on and disabled. The Owner is defined as full access, so its permissions cannot be edited from the matrix.
- Client seats are locked except two permissions: For a Client Viewer (or any custom client-seat role), only View All Projects and Export Data can be toggled. Every other switch is shown faded with a small lock icon, and hovering it reads 'Not available for client seats'.
- Edited cells are highlighted: When you flip an editable switch, its cell gets a soft gold tint to show it is part of your unsaved changes, so you can see exactly what you have touched before saving.
Create a custom role
Click Create Custom Role in the top right to open the create dialog. Enter a Role Name (at least two characters); a read-only Key is generated from the name automatically. Choose a Seat Pool, then click Create Role.
- Role Name and Key: Type a friendly name such as 'SEO Specialist'. The dialog slugifies it into a lowercase key (for example seo_specialist) shown beneath the field. The name must be at least two characters for the Create Role button to enable.
- Seat Pool: Pick Team (counts toward team seats) for a normal role, or Client (counts toward client seats) for a client-facing role. Choosing Client applies the same client-seat lock, so only View All Projects and Export Data will be editable for it.
- Permissions start off: A new custom role is created with every permission turned off. After it appears in the matrix, turn on the switches it should have and save.
💡 Tip A custom role can only be deleted while no active members hold it. If members are assigned, the trash icon's delete is blocked until you reassign them to another role first.
Save or discard your changes
As soon as you change any switch, a dark bar slides up from the bottom reading You have unsaved changes. Click Save Changes to apply every pending edit at once, or Discard to throw them away and revert the switches. Nothing is written to a role until you save.
⚠️ Warning Saving permission changes affects every member with that role immediately. Review your changes before you save.